
# Quickstart
![]()
![]()
This guide will show you how to launch a cluster, import data, and execute SQL queries in a few simple steps. More information on other developer tools, such as the Python Client, can be found in the Developer Tools section.
# How to Launch Your First Cluster
Before performing any data operations, you need to launch a cluster. The Clusters page lets you create a cluster and configure computing and storage resources to meet your requirements.
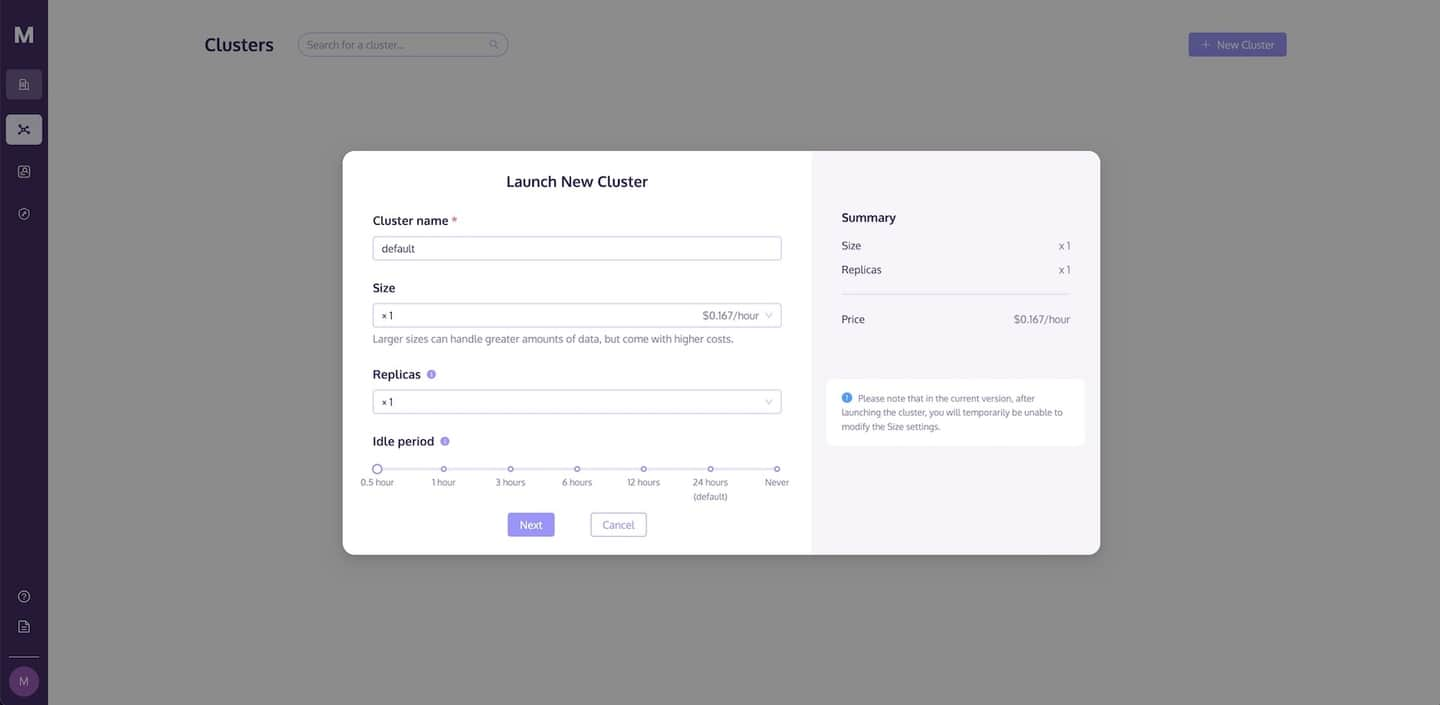
Follow these steps to launch a new cluster:
- Go to the Clusters page and click the +New Cluster button to launch a new cluster.
- Name your cluster.
- Click Launch to run the cluster.
TIP
The development tier of MyScale is limited to the default configuration and does not support multiple replicas. Refer to the Changing Your Billing Plan section and upgrade to the standard plan for a more powerful configuration.
# Environment Setup
You have the option of connecting to a MyScale database using one of the following developer tools:
However, let's use Python to get started.
# Using Python
Before getting started with Python, you need to install the ClickHouse client (opens new window), as described in the following shell script:
pip install clickhouse-connect
Once the ClickHouse client has been installed successfully, the next step is to connect to your MyScale cluster from within a Python app by providing the following details:
- Cluster host
- Username
- Password
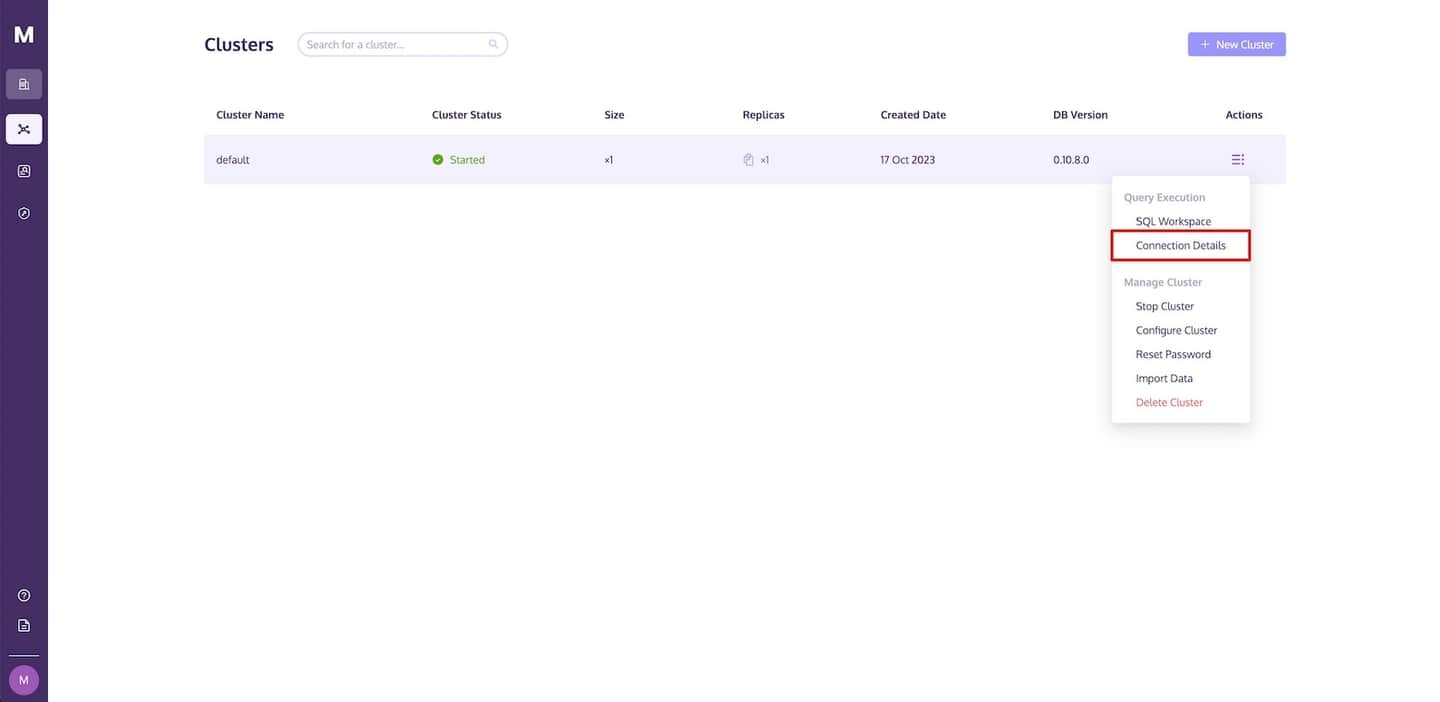
To find these details, navigate to the MyScale Clusters page, click the Action dropdown link, and select Connection Details.
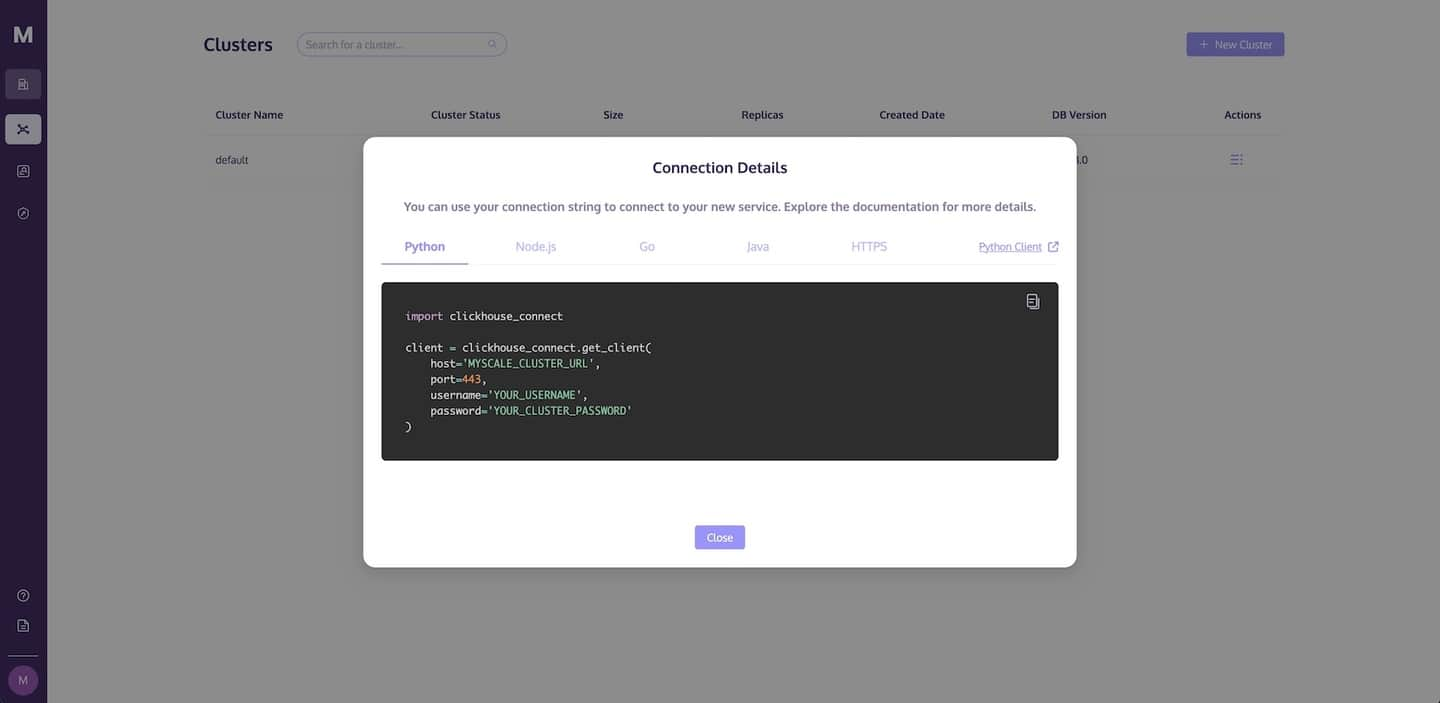
As seen in the following image, a Connection Details dialog will display with the necessary code required to access MyScale. Click on the copy icon to copy the corresponding code and paste it into your Python app.
TIP
See Connection Details for more information on connecting to your MyScale cluster.
# Using the MyScale Console
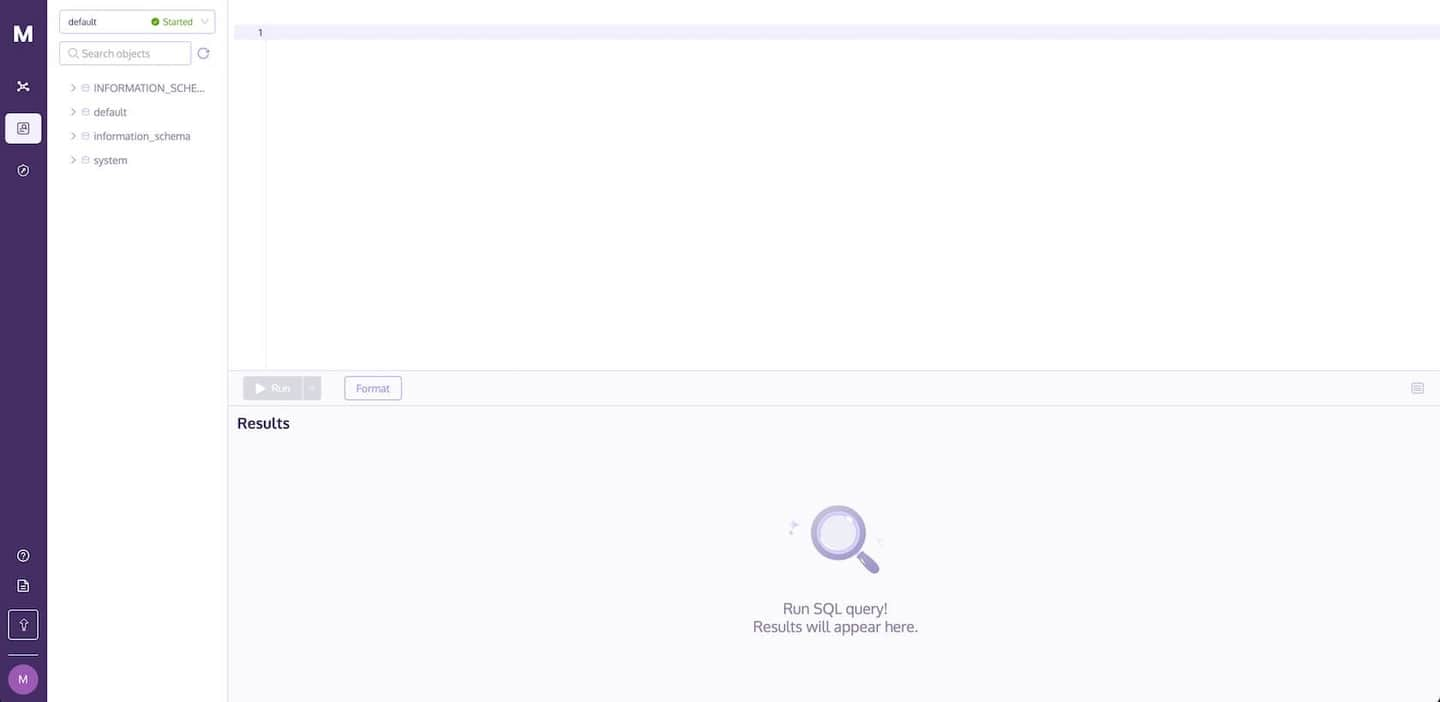
To use the MyScale console to import data into your database and to run queries, navigate to the SQL Workspace page. Your cluster will be selected automatically, as shown below:
# How to Import Data into the Database
Follow these steps to import data into MyScale:
# Create a Table
Creating a database table in MyScale before importing any data is mandatory.
TIP
To learn more, navigate to the document describing how to Create a Database and how to Create a Table in the SQL Reference section.
Using the following code samples, let's write a SQL statement (both in Python and SQL) to create a new table named default.myscale_categorical_search.
- Python
- SQL
# Create a table with 128 dimensional vectors.
client.command("""
CREATE TABLE default.myscale_categorical_search
(
    id    UInt32,
    data  Array(Float32),
    CONSTRAINT check_length CHECK length(data) = 128,
    date  Date,
    label Enum8('person' = 1, 'building' = 2, 'animal' = 3)
)
ORDER BY id""")
# Insert Data Into the Table
TIP
MyScale supports data imports from Amazon s3 and other cloud services using s3-compatible APIs. See the s3 Table Function for more information on importing data from Amazon s3.
As described in the following code snippets, let's use SQL to import data into the default.myscale_categorical_search table.
Supported file formats include:
CSV(opens new window)CSVWithNames(opens new window)JSONEachRow(opens new window)Parquet(opens new window)
TIP
See Formats for Input and Output Data (opens new window) for a detailed description of all supported formats.
- Python
- SQL
client.command("""
INSERT INTO default.myscale_categorical_search
    SELECT * FROM s3(
        'https://d3lhz231q7ogjd.cloudfront.net/sample-datasets/quick-start/categorical-search.csv',
        'CSVWithNames',
        'id UInt32, data Array(Float32), date Date, label Enum8(''person'' = 1, ''building'' = 2, ''animal'' = 3)'
    )""")
# Build a Vector Index
In addition to creating traditional indexes on structured data, you can also create a Vector Index in MyScale for vector embeddings. Follow this step-by-step guide to see how:
# Create MSTG Vector Index
As the following code snippets show, the first step is to create an MSTG vector index, a vector index using our proprietary algorithm, MSTG.
- Python
- SQL
client.command("""
ALTER TABLE default.myscale_categorical_search
    ADD VECTOR INDEX categorical_vector_idx data
    TYPE MSTG
""")
TIP
The index's build time depends on the size of your data import.
# Check Vector Index Build Status
The following code snippets describe how to use SQL to check the vector index's build status.
- Python
- SQL
# Query the 'vector_indices' system table to check the status of the index creation.
get_index_status="SELECT status FROM system.vector_indices WHERE table='myscale_categorical_search'"
# Print the status of the index creation.  The status will be 'Built' if the index was created successfully.
print(f"index build status is {client.command(get_index_status)}")
The output is seen in the following examples:
- Python
- SQL
index build status is Built
TIP
See the Vector Search for further information on vector indexes.
# Executing SQL Queries
Once you have imported data into a MyScale table and built a vector index, you can query the data using the following search types:
TIP
The most significant benefit of building an MSTG vector index is its lightning-quick search speed.
# Vector Search
Conventionally, text or images, such as “a blue car” or images of a blue car, is queried. However, MyScale treats all queries as vectors and returns a response to the query based on the similarity (“distance“) between the query and the existing data within the table.
Use the following code snippets to retrieve data using a vector as the query:
- Python
- SQL
 # pick a random row from the table as the target
random_row = client.query("SELECT * FROM default.myscale_categorical_search ORDER BY rand() LIMIT 1")
assert random_row.row_count == 1
target_row_id = random_row.first_item["id"]
target_row_label = random_row.first_item["label"]
target_row_date = random_row.first_item["date"]
target_row_data = random_row.first_item["data"]
print("currently selected item id={}, label={}, date={}".format(target_row_id, target_row_label, target_row_date))
# Fetch the result of the query.
result = client.query(f"""
SELECT id, date, label,
    distance(data, {target_row_data}) as dist FROM default.myscale_categorical_search ORDER BY dist LIMIT 10
""")
# Iterate through the rows of the query result and print the 'id', 'date',
# 'label', and distance for each row.
print("Top 10 candidates:")
for row in result.named_results():
    print(row["id"], row["date"], row["label"], row["dist"])
The result set containing the ten most similar results is as follows:
| id | date | label | dist |
|---|---|---|---|
| 0 | 2030-09-26 | person | 0 |
| 2 | 1975-10-07 | animal | 60,088 |
| 395,686 | 1975-05-04 | animal | 70,682 |
| 203,483 | 1982-11-28 | building | 72,585 |
| 597,767 | 2020-09-10 | building | 72,743 |
| 794,777 | 2015-04-03 | person | 74,797 |
| 591,738 | 2008-07-15 | person | 75,256 |
| 209,719 | 1978-06-13 | building | 76,462 |
| 608,767 | 1970-12-19 | building | 79,107 |
| 591,816 | 1995-03-20 | building | 79,390 |
TIP
These results are in vector embeddings, which you can use to retrieve the original data by referencing the results' id.
# Filtered Search
Not only can we query data using a vector search (using vector embeddings), but we can also execute SQL queries using a combination of structured and vector data, as the following code snippets describe:
- Python
- SQL
 # Fetch the result of the query.
result = client.query(f"""
SELECT id, date, label,
    distance(data, {target_row_data}) as dist
    FROM default.myscale_categorical_search WHERE toYear(date) >= 2000 AND label = 'animal'
    ORDER BY dist LIMIT 10
""")
# Iterate through the rows of the query result and print the 'id', 'date',
# 'label', and distance for each row.
for row in result.named_results():
    print(row["id"], row["date"], row["label"], row["dist"])
The result set containing the ten most similar results is as follows:
| id | date | label | dist |
|---|---|---|---|
| 601,326 | 2001-05-09 | animal | 83,481 |
| 406,181 | 2004-12-18 | animal | 93,655 |
| 13,369 | 2003-01-31 | animal | 95,158 |
| 209,834 | 2031-01-24 | animal | 97,258 |
| 10,216 | 2011-08-02 | animal | 103,297 |
| 605,180 | 2009-04-20 | animal | 103,839 |
| 21,768 | 2021-01-27 | animal | 105,764 |
| 1,988 | 2000-03-02 | animal | 107,305 |
| 598,464 | 2003-01-06 | animal | 109,670 |
| 200,525 | 2024-11-06 | animal | 110,029 |